Potato Prints

Food: good to eat, exciting to cook with, and amazing for artwork!
You’ll probably remember making potato prints from your school-days; today with the ever-growing interest in all forms of home crafting, stencilling, of which potato printing is a simple form, is popular again for all sorts of artwork. Not that your kids will care about that! It will be the pleasure of playing with paint that’ll get them hooked.
The youngest children can create simple paintings; a little older and they can make their own greetings cards; more patience and they can move on to wrapping paper. Wall-paper is probably a step too far but who knows …!
What you need:
- Several baking-size potatoes
- Poster paints or tempera
- Pencil
- Small trays or large saucers
- Paintbrush
- Knife
- Paper or card
- Paper towels
- Marker pens, glitter (optional)
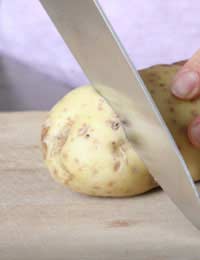
- First you need to cut a potato in half. Try and make it a clean cut leaving a flat surface – this will give the best result when printing. Blot the potato as dry as possible on the paper towel.
- Next, using the pencil, your child draws a design on the cut-side. Depending on the age of the child and how complicated the design is, it might be easier for your child to draw it on paper and for you to cut it out and trace it onto the potato – but make sure he doesn’t draw anything bigger than the potato! (You could trace the potato onto paper first to give him and outline to work within.)
Simple shapes work best: square, circle, triangle, smiley face, star, Christmas tree, and letters. By cutting a variety of shapes in separate potatoes, using different colours for each, and repeating the print down the page, quite complicated patterns can be created.
If your child’s name is short and simple, you might like to make stencils of the individual letters; even if you child is called Trixybelle, most letters are relatively easy to cut out.
- Then the background has to be cut away leaving the shape raised (by about ¼”). If you accidentally cut away the shape, don’t worry: you’ll just create a negative image, which is useful for another effect to add to a pattern.
Again depending on the age of your child, you will probably have to do the cutting, but you could give her a spoon and she can dig away the background herself. The end result might not be so neat but it’ll be all her own work.
- Put a thin layer of paint in the tray or saucer. Bright primary colours will give good results.
- Dip the potato half in the paint then press down firmly on a sheet of paper (or card or brown paper). Repeat as many times as required. Until the potato is dipped in the paint again, the print will gradually get paler, with a pretty fading effect.
Allow one colour to dry before using another colour on the same paper. To use the potato for another colour, first wash and dry it. By using the same shape but in a different colour, a variety of effects can be created. Try printing almost exactly on top of the first print for a shadow. What happens when you line the prints up exactly on top of each other? Does it look better if they’re side by side?
If there are several separate shapes in the design, you could use a paintbrush to colour each shape differently.
- When you’ve finished with one design simply cut it off the potato and start again. Keep doing this until you run out of potato!
To finish off the painting your child might like to add some detail with felt pen, or, especially if it’s a Christmas or birthday card, glue and glitter it.
- When your child’s had enough, throw the potato away: it won’t keep!
Of course, you can also use other vegetables and fruits: carrot, swede, a chunk of cabbage, half an apple, or a cauliflower or broccoli floret. Let your imagination run riot!
Related Articles in the 'Food Crafts' Category...


Re: Teaching Kids Food Hygiene
love it Find kids cooking recipes that are easy, quick and cheap. Search for fun recipes for cooking with kids including kids…
Re: Foraged Feasts: Autumn and Winter
i like this advertisement. i will learn more out of this
Re: Main Meals for Kids
This is a brill website as I have made the Tommy Pasta and The Fishy Dishy. It is lush although not enough for me and the family
Re: Teaching Kids Where Food Comes From
I like this website it helps alot with my children homework
Re: Baking Bread With Kids
This doesn’t deal with involving the kids. When the dough is ready for kneading is a good time to bring them in as they’ll enjoy pounding…
Re: Teaching Kids Food Hygiene
micro organisms stick because they are little think that can go on the kitchen {even the ass}
Re: Cookies and Biscuits
For a really delicious variation on the oaty cookies, add raisins. I had oatmeal and raisin cookies in the US and they're delicious. Plus, in…
Re: Kitchen Safety for Kids
All the information is very useful because I love cooking. Thank you so much. It would be so useful for my brother.
Re: Pizzas and Toppings
Wow pizza turned out great I'm going to use this recipe all the time I don't think I'm ever going to buy a take away again !
Re: Cookies and Biscuits
My whole family love the choc chip cookies brill recipe